Hello,
Thank you for your query.
I assume You have successfully connected to two separate openVPN Servers.
1) Navigate to Services -> VPN -> OpenVPN On your OpenVPN Client , it should look similar to this:

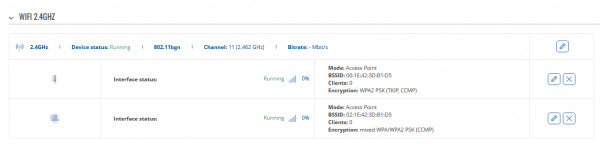
2) Navigate to Network -> Wireless -> Click Add, and add another Access Point. After configuration, it should look similar to this:
3) When configuring Wireless access point, you would also need to create another LAN interface(wireless lan):
I have written detailed instructions on how to do it here: https://community.teltonika-networks.com/41739/rutx12-no-dhcp-over-wifi
4) Create openVPN interfaces via CLI
4.1) Open the routers CLI, more info here: https://wiki.teltonika-networks.com/view/Command_Line_Interfaces#Windows
4.2) Create first OpenVPN interface, execute the following commands:
- uci set network.vpn1='interface'
- uci set network.vpn1.ifname='tun100'
- uci set network.vpn1.proto='none'
- uci set network.vpn1.metric='100'
- uci commit
- /etc/init.d/network restart
4.3) Create 2nd OpenVPN interface, execute the following commands:
- uci set network.vpn2='interface'
- uci set network.vpn2.ifname='tun50'
- uci set network.vpn2.proto='none'
- uci set network.vpn2.metric='100'
- uci commit
- /etc/init.d/network restart
For verifcation, type in ifconfig command and check the output, you should be able to see two additional interfaces:
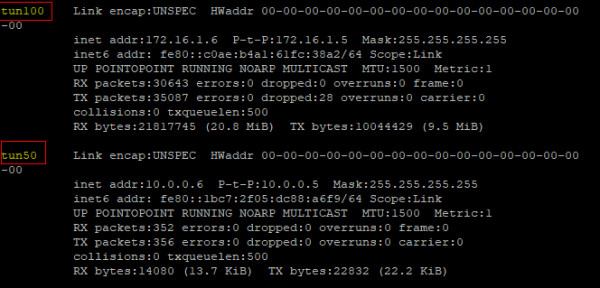
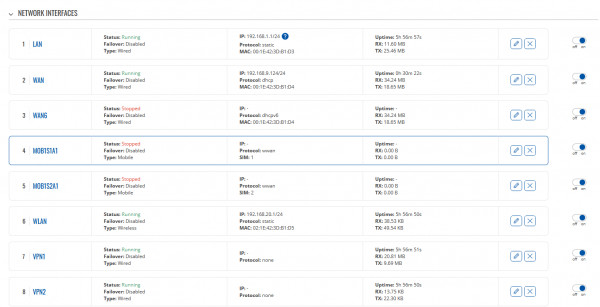
Your Interfaces should look similar:
5) Install and setup VPN policy routing
5.1) Installing VPN policy routing package:
5.2) Setup VPN policy routing, execute the following commands:
-
uci set vpn-policy-routing.config.enabled="1"
uci set vpn-policy-routing.config.resolver_ipset="none"
uci set vpn-policy-routing.config.webui_show_ignore_target="1"
while uci -q delete vpn-policy-routing.@policy[0]; do :; done
-
uci add vpn-policy-routing policy
uci set vpn-policy-routing.@policy[-1].dest_addr="192.168.0.0/16"
uci set vpn-policy-routing.@policy[-1].interface="ignore"
6) Edit Firewall Rules on both VPN Servers
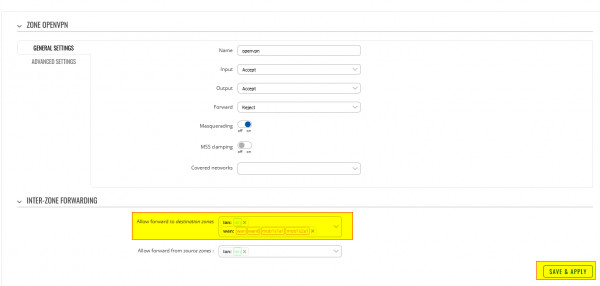
- Open the WEBUI of each VPN Server and navigate to Network -> Firewall -> General Settings. Find the openVPN Zone and edit it:

- Scroll down to the Inter-Zone forwarding and edit the Allow forward to destination zones, add WAN.
Note: Please note, that the firewall zone editing is required on both VPN Servers. In addition, this has been configured using two other devices as OpenVPN Servers, however, if in your case OpenVPN Servers have not been hosted on Teltonika Networking equipment, you would have to allow OpenVPN zone forwarding to both LAN and WAN zones. Also, I have not included full OpenVPN configuration as that would make this example too extensive, however, here is a link on how to configure OpenVPN: https://wiki.teltonika-networks.com/view/OpenVPN_configuration_examples
Also, I would like to add that I have used my original LAN network 192.168.1.0/24 for AP1(Access point) and my WLAN network 192.168.20.0/24 for AP2. Therefore, uci set vpn-policy-routing.@policy[-1].dest_addr="192.168.0.0/16" was sufficient enough as it covers both networks, however, if your network addresses differ just make sure that you have both networks covered here.
Lastly, Regarding Wireless LAN interface creation, follow my guide here:
https://community.teltonika-networks.com/41739/rutx12-no-dhcp-over-wifi
Please note, that you will create a new AP, I have edited an already existing in the example, however, the configuration is identical.
And one last thing, this configuration has been carried out on our newest firmware version: RUT9_R_00.07.01.2
Download link: https://wiki.teltonika-networks.com/view/RUT950_Firmware_Downloads
Configuration will vary on Legacy firmware versions, therefore, I recommend upgrading. This guide is not applicable to legacy Firmware versions.
Best Regards,
Dziugas K.
